Use Adobe Camera RAW to Edit Video


I have been shooting RAW images with my camera for over four years now. Thus, I am very comfortable using the Adobe Camera Raw (ACR) editor in both Photoshop and Photoshop Elements.

I also take a fair amount of videos with my digital camera, which always need some sort of editing. I generally use Adobe’s Premiere Elements of Microsoft’s Movie Maker as my video editor.

Blog Post 1-5-14

For a while now, Photoshop has been able to edit video clips, but I have not really made much use of it. However, Photoshop CC has taken its video editing capability to a new level that is quite intriguing to me. In Photoshop CC, if you import a video clip and then turn it into a Smart Object, you then can edit the clip using the Adobe Camera Raw as a filter. Doing this I can use the same tools and sliders that I routinely use on my still images to edit my video clips. By converting the clip to a Smart Object, every frame is corrected rather than just the first frame of the video.

Below the before and after example of my first attempt at correcting a video clip in this way. The original was shot in lighting that resulted in the video having low contrast and no real snap. I corrected it as described above.  I only made a subtle change using the ACR, but it did improve the video.

Original Video Clip

http://www.youtube.com/watch?v=Y2d2zjszGJo

Edited With Adobe Camera RAW

http://www.youtube.com/watch?v=qSem6stGEfU

This certainly warrants more investigation on my part. Also, can I get the same or better results using Premiere Elements or Movie Maker?

Have of you tried this approach? What did you think of the results?

Edit JPEG Images as Camera RAW Files


What is a RAW File?

Many digital cameras today can take RAW images instead of or in addition to JPEG images. When you set your camera to take RAW images, whatever camera settings like, white balance etc, that are set, are embedded in the file, but not applied to the image. Also,when  the image is stored on your memory card, it is not compressed as it is when storing it as a JPEG image. However, the resulting RAW file is much larger; thus you cannot store nearly as many images on your card as you can if you save the image in the usual JPEG format. In addition, it takes longer for your camera to write the data to the memory card, so it is not ready to take the next shot as quickly.

That’s the downside. The advantage of shooting RAW instead of JPEG images is that it avoids the JPEG compression that lowers the quality of the image as it is being saved to your memory card. Plus, since no manipulation has been done to the recorded pixels, you have a lot more flexibility when editing the image in Photoshop Elements. Generally speaking, you can make larger corrections without losing quality. In addition, there are are a additional sliders available in the Photoshop Elements’ Camera Raw editor that are not available from within the Full Editor.

That being said, most of us do not shoot RAW with our cameras. We leave that to the professionals, preferring to stay with our JPEG images. Well, what if we could open and adjust our normal JPEG images in the Camera Raw Editor of Photoshop Elements? Well we can. You don’t get all of the advantages you get from starting with a RAW image, but at least you can use the same techniques and sliders. You may find that the results you get are not only better, but also easier and quicker to apply. Try it and see for yourself.

Using the Camera RAW Editor 

Here’s how you do it.

  1. Open the Full Editor in Photoshop Elements
  2. On the Menu, click on File > Open As…
  3. In the Open As.. dialog box, select Camera RAW on the Open As line. Navigate to and select your JPEG image and click on Open.

Your JPEG image opens in the Camera Raw Editor as if it were a RAW image.

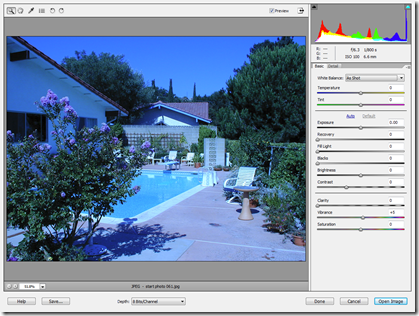
image

The image above is the original JPEG as it opened in the Camera RAW Editor.

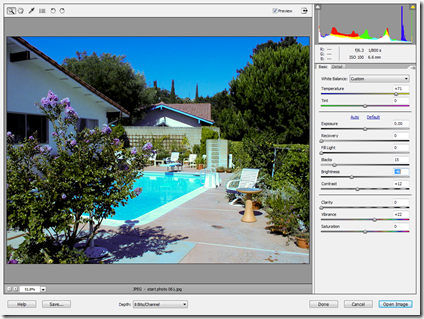
The original was taken on a bright sunny day with my camera set for incandescent light, so it’s way too blue. After a couple of quick adjustments, mostly with the Temperature slider, the image below resulted.

image 

Now all need to do is click on Open to open the image in the Full Editor of Elements for any additional cropping etc I want to do. I have used this example a lot in my classes to remove the color cast using Levels. The results I obtained with the Camera RAW Editor are every bit as good and, I am able to do it much quicker.

There is a lot more to using the Camera Raw Editor than what I’ve shown here. The important thing is you do not have to start with a RAW image to make excellent use of it.

The screen shots were from PSE 5, but the steps are the same in both PSE 4 and PSE 6. Just make sure you have the latest version of Adobe’s Camera RAW 4.3.1, which you can download for from Adobe by clicking here.

Try it out and let me know what you think by leaving a comment.